How To Organize Kitchen Tools: Drawers, Racks & Countertops
February 19, 2026 · Ron Sublett
Opening a kitchen drawer only to find a tangled mess of spatulas, whisks, and random gadgets is frustrating. If you've been wondering how to organize kitchen tools effectively, you're not alone, cluttered kitchens rank among the most common household headaches. Disorganized storage doesn't just look chaotic; it wastes your time and makes cooking feel like a chore.
This guide walks you through practical solutions for drawers, racks, and countertops. You'll discover straightforward methods to categorize your utensils, maximize space, and keep everything within reach. Whether you're working with a compact apartment kitchen or a spacious cooking area, these tips apply to any layout or budget.
At Epic Trends Store, we specialize in affordable kitchen gadgets that solve everyday problems, including storage challenges. Below, you'll find actionable advice paired with smart product recommendations to help you transform your kitchen from cluttered to functional.
What to do before you reorganize
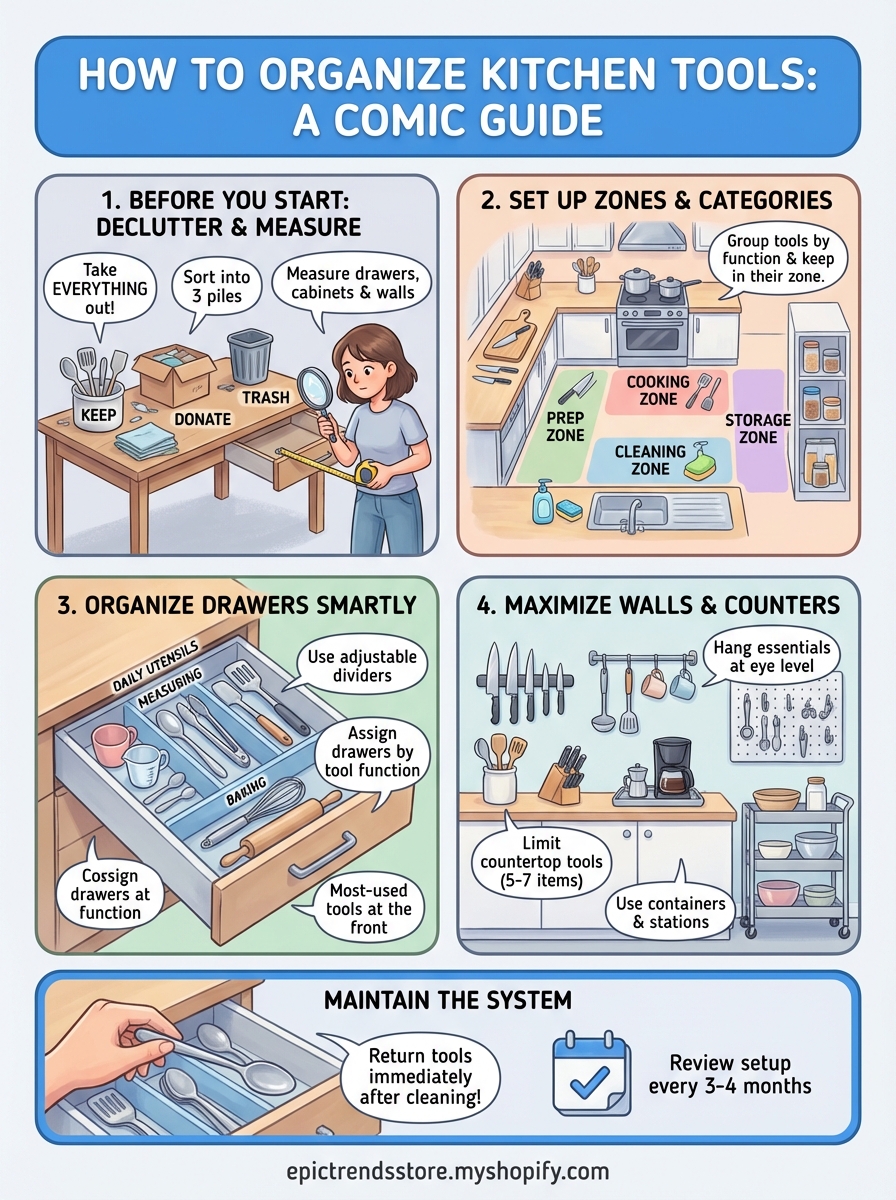
You can't build an effective storage system until you know exactly what you're working with. Jumping straight into drawer dividers or buying new racks without a clear plan leads to wasted money and continued clutter. Taking 30 minutes upfront to assess your tools and space saves hours of frustration later.
Take everything out and declutter
Pull every single utensil, gadget, and tool from your drawers, cabinets, and countertops. Spread everything on your kitchen table or counter so you see your complete inventory. This visual shock often reveals how many duplicate spatulas or broken can openers you've been hoarding without realizing it.
Sort items into three piles: keep, donate, and trash. Ask yourself if you've used each tool in the past six months. If you own three vegetable peelers but only use one, donate the extras. Throw away anything with rust, broken handles, or missing parts.
Before you figure out how to organize kitchen tools, you need to know which tools actually deserve space in your kitchen.
Once you've decluttered, group similar items together on the table. Place all measuring spoons in one spot, whisks in another, and knives in a third. This preview helps you visualize how much space each category requires and which tools you use most frequently.
Measure your available space
Grab a tape measure and record the exact dimensions of your drawers, cabinets, and wall areas. Write down the width, depth, and height of each drawer. Measure cabinet door clearance to determine if you can add inside-door organizers without blocking shelves.
Check your wall space for potential vertical storage options. Measure the distance between your counter and upper cabinets to see if you have room for a magnetic knife strip or hanging rail system. Note any awkward corners or dead zones where you could add pull-out organizers or lazy Susans.
Document which electrical outlets are available for countertop appliances. Calculate your usable counter space by measuring the area that remains after accounting for your coffee maker, toaster, and other permanent fixtures. These measurements prevent you from buying organizers that don't fit or overcrowding your workspace.
Set up kitchen zones and categories
Your kitchen works better when you store tools near where you actually use them. Zone-based organization matches your workflow instead of fighting against it. This approach reduces the back-and-forth movement that turns simple meal prep into an exhausting obstacle course.
Create functional work zones
Divide your kitchen into four primary zones: prep, cooking, cleaning, and storage. Your prep zone near the counter should house cutting boards, knives, peelers, and mixing bowls. Place pots, pans, spatulas, and cooking spoons in the cooking zone closest to your stove and oven.
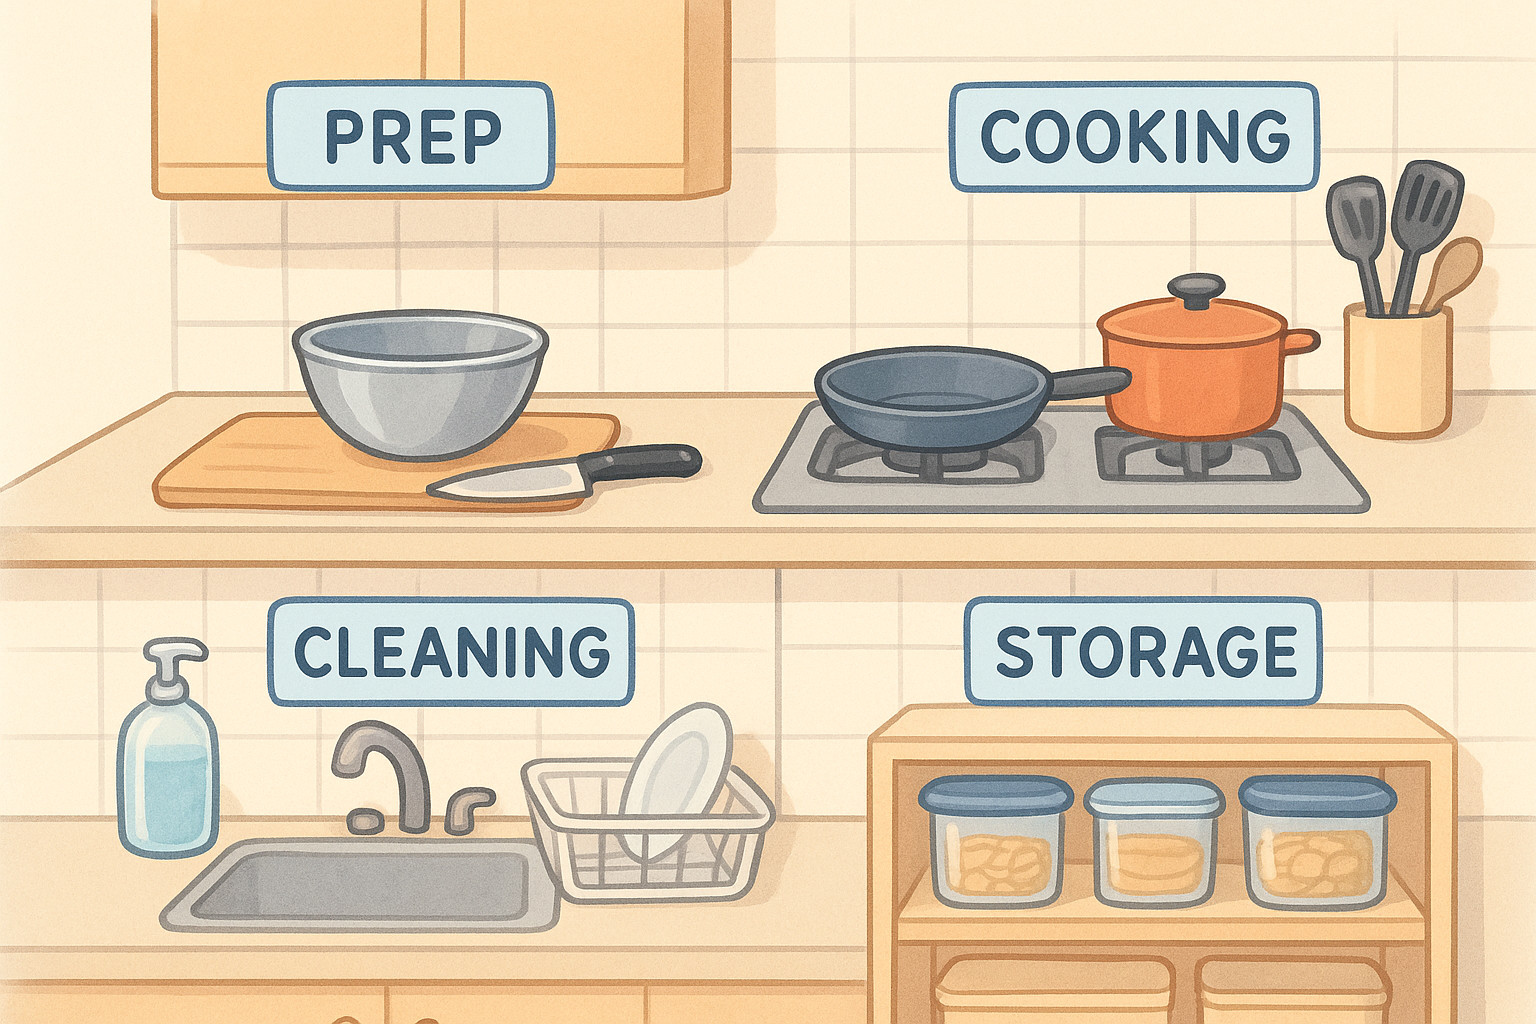
Store dish soap, scrubbers, and drying racks in the cleaning zone around your sink. Keep food storage containers and pantry staples in a dedicated storage area separate from daily cooking tools. This separation prevents you from opening three different cabinets to assemble one sandwich.
Placing your most-used tools in their corresponding work zones cuts your cooking time by eliminating unnecessary steps between tasks.
Test your zones by mentally walking through a typical recipe. If you find yourself crossing the kitchen repeatedly for basic tools, adjust your storage locations before committing to permanent organizers.
Group tools by category
Within each zone, sort tools into specific categories that match your cooking habits. Create groups for cutting tools, stirring utensils, measuring equipment, and serving pieces. Baking enthusiasts might separate whisks, rolling pins, and pastry brushes into their own category.
Label each category either mentally or with physical tags if you share the kitchen with others. When you understand how to organize kitchen tools by both zone and category, you build a two-layer system that keeps everything logical and accessible.
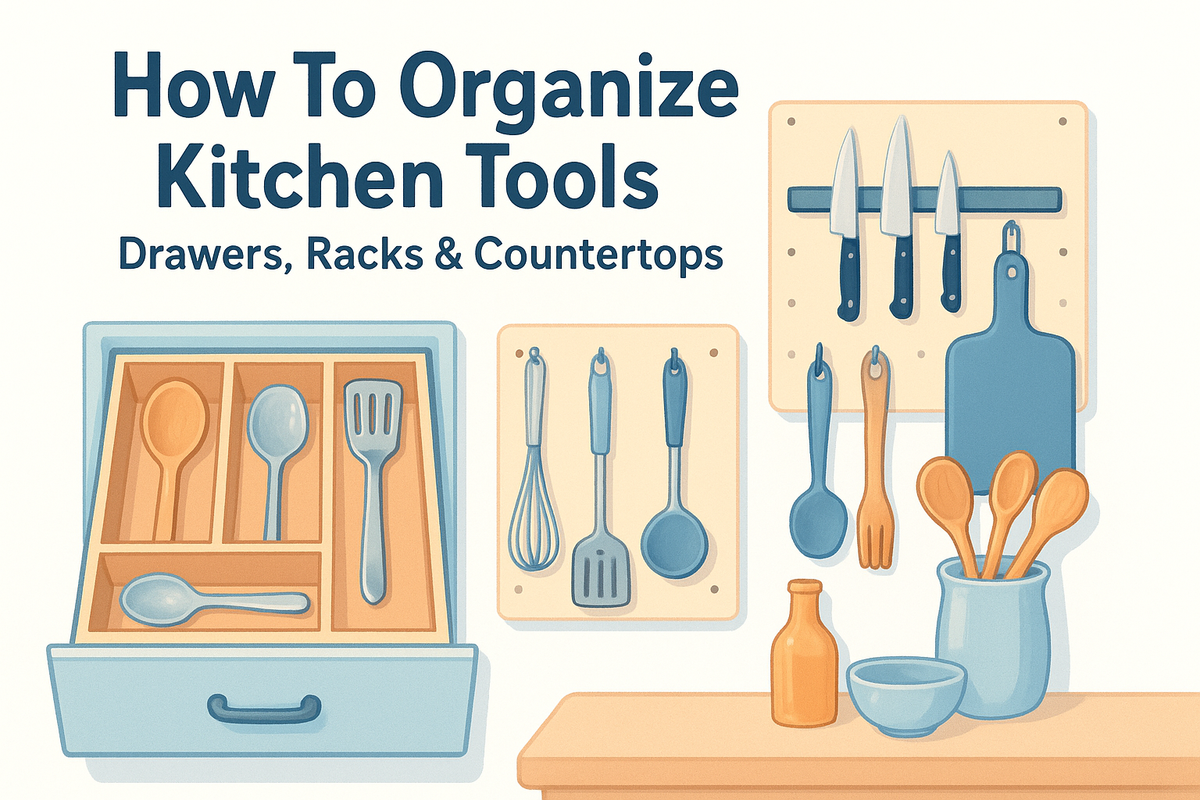
Organize kitchen tools in drawers
Drawer storage offers the cleanest solution for daily kitchen tools when you implement dividers and assign each item a permanent home. Without a clear system, utensils slide around every time you open the drawer, and you waste time digging through piles to find a single spoon. Strategic drawer organization transforms these spaces into efficient retrieval systems.
Install adjustable drawer dividers
Drop adjustable dividers into your drawers to create customized compartments that match your tool sizes. These organizers prevent utensils from migrating across the drawer when you open and close it. Measure your drawer dimensions first, then choose dividers that fit snugly without rattling.
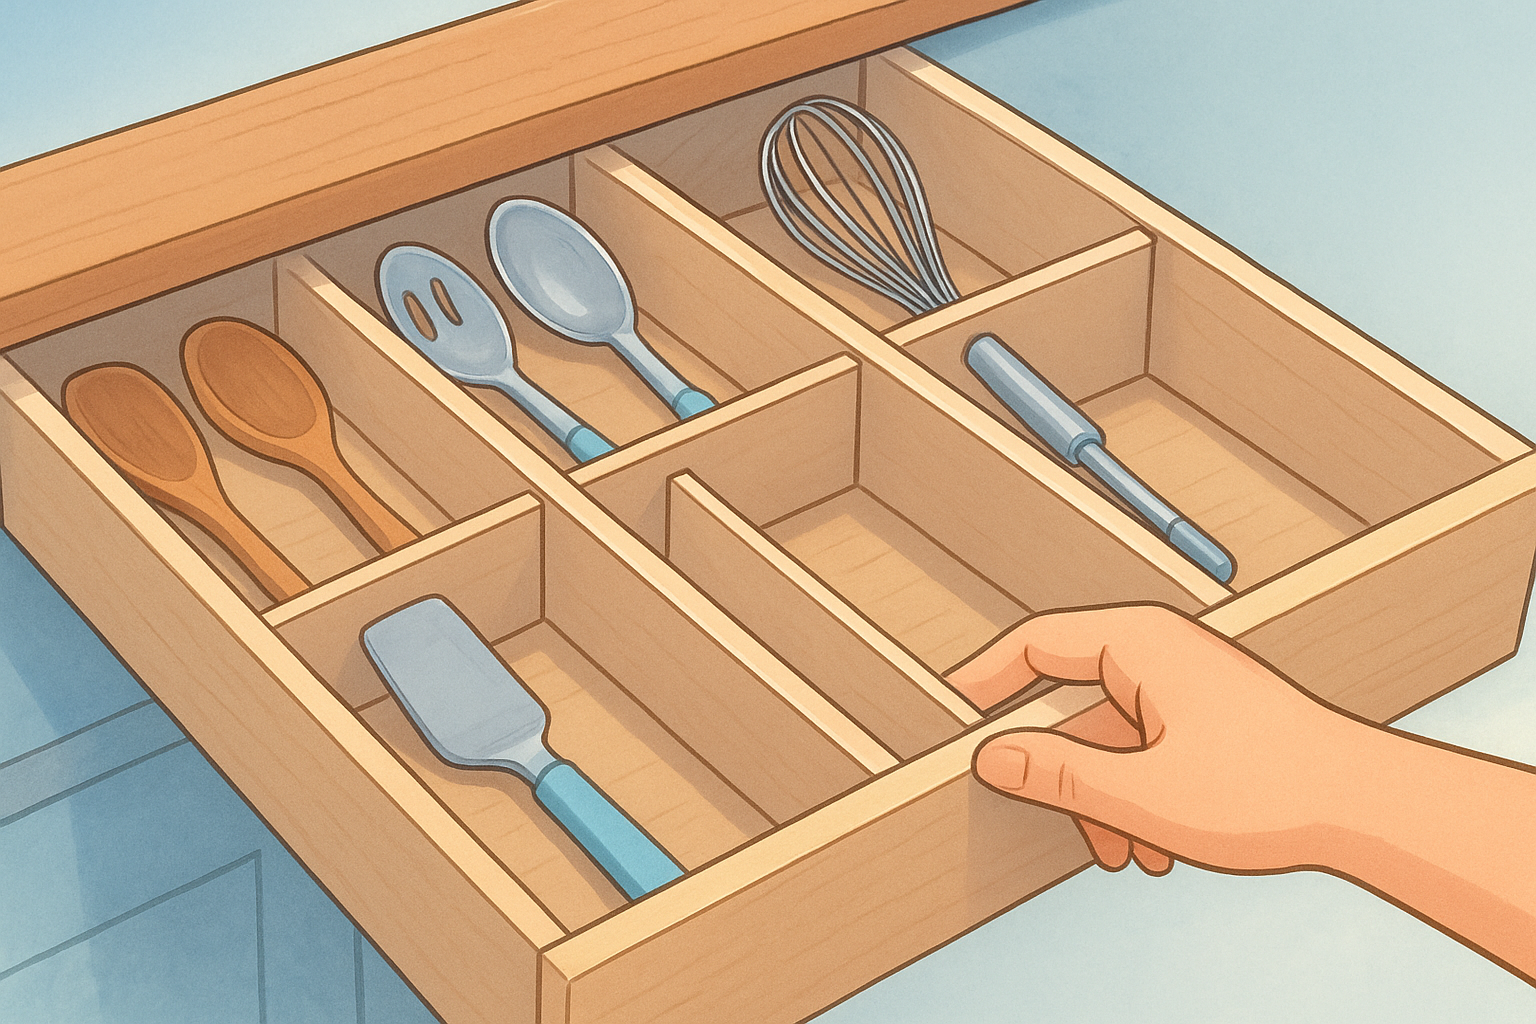
Place your most-used tools in the front sections of your top drawer. Reserve back compartments for specialty items like meat thermometers or garlic presses that you need less frequently. This front-to-back hierarchy keeps your workflow smooth without requiring you to reach past rarely used gadgets.
Drawer dividers only work when you commit to returning each tool to its designated spot after washing and drying.
Assign drawers by tool function
Dedicate your top drawer to everyday utensils: spatulas, wooden spoons, tongs, and whisks. Store knives in a separate in-drawer knife block or dedicated slot organizer to protect the blades and your hands. Understanding how to organize kitchen tools in drawers means matching drawer depth to tool size.
Use your second drawer for measuring cups, spoons, and timers. Keep baking tools like pastry brushes and bench scrapers in a third dedicated drawer if you have the space. Separate drawers by function prevent cross-contamination between raw food prep tools and cooking utensils.
Create a simple drawer map:
| Drawer Location | Tool Category | Example Items |
|---|---|---|
| Top drawer | Daily cooking | Spatulas, spoons, tongs |
| Second drawer | Measuring | Cups, spoons, thermometer |
| Third drawer | Baking | Whisks, pastry brush, rolling pin |
Use racks and wall space without clutter
Wall storage multiplies your usable kitchen space by moving tools off counters and out of overstuffed drawers. Vertical organization keeps your most-reached-for items visible and accessible without creating a chaotic wall of clutter. The key lies in selecting strategic mounting locations and limiting what you hang to truly essential tools.
Choose the right wall-mounted solutions
Install a magnetic knife strip 18 inches above your prep counter to keep blades sharp and safely stored. This single bar holds eight to ten knives without requiring drawer space or a bulky countertop block. Metal utensils like spatulas and ladles also stick to magnetic strips when you need additional hanging storage.
Mount an S-hook rail system along your backsplash for tools you grab multiple times daily. Hang measuring cups, wooden spoons, and tongs from the hooks so they remain within arm's reach of your stove. Choose rails with removable hooks that you can reposition as your cooking habits change.
Wall storage only reduces clutter when you limit yourself to items you actually use every single day.
Pegboard panels transform blank walls into customizable storage grids. Insert hooks and shelves wherever your specific tools require them, then rearrange the configuration without drilling new holes. This flexibility matters when you discover how to organize kitchen tools based on your evolving needs.
Install storage at proper heights
Position your most-used hanging tools between shoulder and waist height for easy grabbing without stretching or bending. Mount less frequent items like specialty graters or pastry brushes above eye level where they stay accessible but don't dominate your visual space.
Leave at least 12 inches of clearance between hanging tools and your countertop work surface. This prevents utensils from interfering with cutting boards or mixing bowls during meal prep.
Keep tools tidy on countertops and carts
Countertops function as your primary workspace, so cluttering them with unnecessary tools sabotages your cooking efficiency. Visible storage only makes sense when you select items you genuinely use daily and organize them in defined containers. Random utensil piles create visual chaos and waste valuable prep space that belongs to cutting boards and mixing bowls.
Select tools that earn counter space
Limit your countertop tools to the five to seven items you grab at least once every day. A utensil crock near the stove should hold your most-reached-for spatulas, wooden spoons, and tongs. Everything else belongs in drawers or on wall storage.
Keep a single cutting board propped vertically in a countertop holder instead of stacked horizontally where they slide around. Store your daily knife in a small countertop block holding three to four blades maximum. When you learn how to organize kitchen tools on visible surfaces, less always delivers more functionality.
Countertop storage should serve your workflow, not showcase your entire utensil collection.
Use containers and stations
Group related tools into dedicated containers that define their purpose and location. Place your coffee-making supplies in a single tray or basket that corrals filters, spoons, and sweeteners. This station approach prevents individual items from migrating across your counter.
Rolling carts add mobile storage for tools you need in multiple zones. Load your cart with mixing bowls, measuring equipment, and portable appliances you roll between your prep area and stove. Lock the cart's wheels when parked to maintain stability during use.
A simple way to keep it organized
Maintaining your organized kitchen requires one simple habit: return each tool to its designated spot immediately after washing. This single action prevents the gradual slide back into chaos that undoes all your reorganization work. When you understand how to organize kitchen tools and commit to the system you've built, your kitchen stays functional without constant overhauls.
Review your setup every three to four months to catch problems before they spiral. Remove tools you haven't touched, adjust drawer dividers that shifted, and wipe down your wall-mounted racks. These quick maintenance checks take ten minutes but preserve months of organizational effort.
Ready to upgrade your kitchen with storage solutions that actually work? Browse our collection of affordable kitchen organizers and gadgets designed to maximize your space without breaking your budget.